🎉 ⏱ Ready to build? Get early access now!⏱ 🎉

Sign-in with Ethereum using thirdweb connect wallet
Add a connect wallet button to your website including a signing functionality
Introduction
Welcome to the thirdweb Component Library. This package provides you with extensible components to handle the web3 side of your app.
We simplify the process of integrating web3 into your apps while making sure that you still have all the control you would using other lower level web3 frontend libraries.
Our main features are:
- Support for most commonly used web3 providers including: MetaMask, WalletConnect, Coinbase Wallet, and Magic Link.
- An app wide context containing an ethers.js or web3.js instance with everything you need to integrate with the blockchain.
- Easy-to-use plug-and-play components that let you implement complex and fully-featured web3 app setups with only a few lines of code.
Get Started
To get started with the Thirdweb Component Library, you just need to setup the ThirdwebWeb3Context that provides all the context consumed by your app, and the ThirdwebThemeProvider, which lets you use our custom components.
Setting up this context is as easy as wrapping your app with the following setup:
import { ThirdwebWeb3Provider, ThirdwebThemeProvider } from "@3rdweb/react"; const App = ({ children }) => { // Put the ethereum chain ids of the chains you want to support const supportedChainIds = [1, 4, 137]; /** * Include the connectors you want to support * injected - MetaMask * magic - Magic Link * walletconnect - Wallet Connect * walletlink - Coinbase Wallet */ const connectors = { injected: {}, magic: { apiKey: "pk_...", // Your magic api key chainId: 1, // The chain ID you want to allow on magic }, walletconnect: {}, walletlink: { appName: "thirdweb - demo", url: "https://thirdweb.com", darkMode: false, }, }; /** * Make sure that your app is wrapped with these contexts. * If you're using Next JS, you'll have to replace children with the Component setup */ return ( <ThirdwebWeb3Provider> <ThirdwebThemeProvider>{children}</ThirdwebThemeProvider> </ThirdwebWeb3Provider> ); };
Connect Wallet & Web3 Setup
Currently, we provide you with components and hooks to easily integrate web3 into your app and setup an app wide context without having to deal with the complexity of lower level web3 configuration.
There are two main ways to implement wallet connection and web3 integration with the Thirdweb Component Library, both of which we will go over below:
- You can use our fully configured
ConnectWalletcomponent to handle all web3 connection and integration, including wallet connection and network switching. This is the easiest way to use the Thirdweb Component Library. - If you want to make your own unique web3 connection setup, you can use our
useWeb3anduseSwitchNetworkhooks to make your own custom component.
Use Connect Wallet
Using our ConnectWallet component is the easiest way to integrate web3 into your app, complete with network switching, wallet connection, and everything else you need. Adding our connect wallet button is as easy as the following:
import { ConnectWallet } from "@3rdweb/react"; const Connect = () => { return <ConnectWallet />; };
You can place this button anywhere in your app and it will display a wallet connection that displays connected chain, wallet address, and balance information as well as a fully-featured connection manager modal.
For a fully functional setup using our ConnectWallet button, you can checkout our NextJS example connect page.
Use Custom Hooks to sign with your Wallet
We will build our own custom component that will allow you to authorise any action by signing it with your wallet.
We will generate a message to be signed by the user. After the message is signed, this will create an encrypted message that the server can validate. Once validated the server will create a JWT, allowing the user to make any change to his/her profile in the database.
In this example we will authorise the adjustment of a username in our database by signing using our wallet. In this example we will use a MetaMask wallet.
Check out this diagram for a visual representation of what we will do
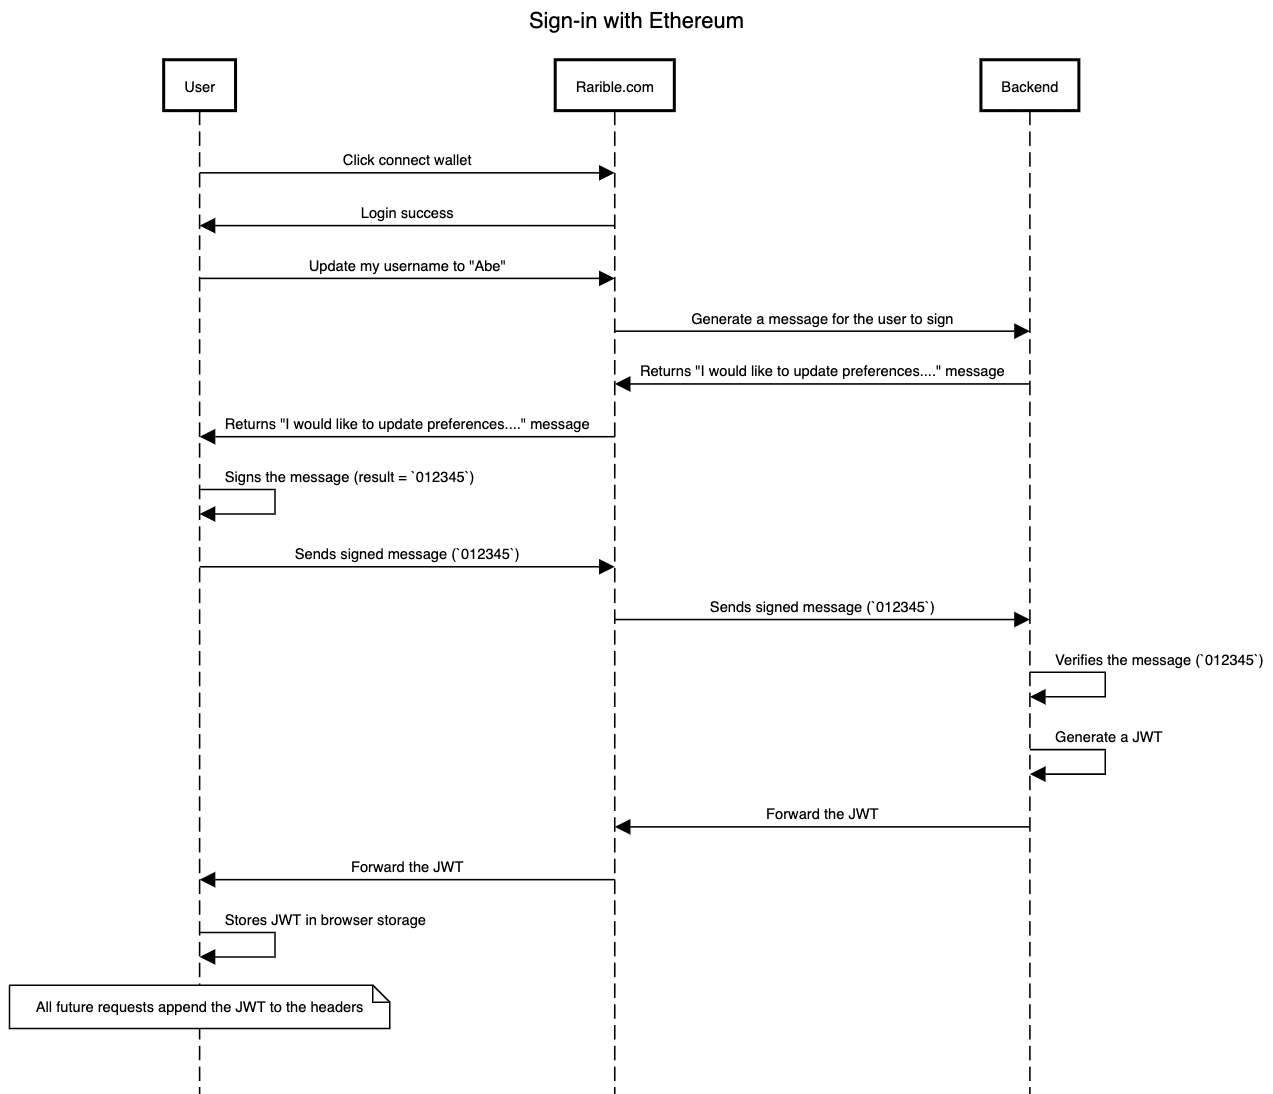
A workflow showing the signature process
You can find the GitHub repo over here.
First lets create our homepage with the Connect Wallet component
import { useWeb3 } from "@3rdweb/hooks"; import { ConnectWallet } from "@3rdweb/react"; /*import Profile from "../components/Profile"; */ export default function Home() { const { address } = useWeb3(); return ( <div> <ConnectWallet></ConnectWallet> {address ? <Profile></Profile> : <h1>Please connect your wallet</h1>} </div> ); }
Next up lets create our backend that will simulate our database on a server. For this im going to use a docker image which builds a Redis database. Here is the yaml file if you want to do the same:
version: "3.9" services: redis: image: "redis:alpine" ports: - "6379:6379"
Let's write the code for our database.
Create a folder called db and inside create a file db.ts.
Below is the code that builds the database, a basic schema, a function to get the username and set the username:
//Import the library import Redis, { Redis as RedisClient } from "ioredis"; //we're doing everything local, so set the host to 'local host' const REDIS_HOST = "localhost"; interface IDatabase { getUser(address: string): Promise<string | null>; setUser(address: string, user: string): Promise<void>; } export default class Database implements IDatabase { private db: RedisClient; constructor() { this.db = new Redis(6379, REDIS_HOST); } public async getUser(address: string): Promise<string | null> { return this.db.get(address); } public async setUser(address: string, user: string): Promise<void> { await this.db.set(address, user); }
Let's execute the code and 'deploy' our database. Inside our db folder create a file instance.ts and add the following code.
import Database from "./db"; const database = new Database(); export default database;
Now that we have created our database and deployed it, let's create our message.
We will need to generate the message in our database which will then be displayed in the browser. Head over to db.ts and the following code:
import Redis, { Redis as RedisClient } from "ioredis"; const REDIS_HOST = "localhost"; //Import the library interface IDatabase { getUser(address: string): Promise<string | null>; setUser(address: string, user: string): Promise<void>; generateChallenge(address: string): Promise<string>; } export default class Database implements IDatabase { private db: RedisClient; constructor() { this.db = new Redis(6379, REDIS_HOST); } public async getUser(address: string): Promise<string | null> { return this.db.get(address); } public async setUser(address: string, user: string): Promise<void> { await this.db.set(address, user); } //define the message, we will call it 'generateChallenge here'. // this will create a random string of characters to be verified by the users. //this can be anything. It can also be a standard message. public async generateChallenge(address: string): Promise<string> { const challenge = Math.random().toString(36).substring(2, 15); await this.db.set(`${address}:challenge`, challenge); return challenge; } //this function will returned the stored challenge public async getChallenge(address: string): Promise<string | null> { return this.db.get(`${address}:challenge`); } }
Create a new folder called api and inside it a new file called challenge.ts. This is where we will handle the call to generate our message.
import { NextApiResponse, NextApiRequest } from "next"; import database from "../../db/instance"; export default async function challenge( req: NextApiRequest, res: NextApiResponse ) { const body = JSON.parse(req.body); console.log(body); console.log( "In the server, generating challenge for address " + body.address ); const address = body.address; const challenge = await database.generateChallenge(address); return res.status(200).json({ challenge });
Inside our folder api create a file jws.ts. Now we need to make sure our backend generates a JWT after we the message has been signed and validated by our back-end.
import { ethers } from "ethers"; import { NextApiResponse } from "next"; import { NextApiRequest } from "next"; import { sign } from "jsonwebtoken"; import database from "../../db/instance"; export default async function jwt(req: NextApiRequest, res: NextApiResponse) { const body = JSON.parse(req.body); const { address, signedChallenge } = body; const expectedChallenge = await database.getChallenge(address); if (expectedChallenge === null) { return res.status(404).json({ message: "No challenge found for address" }); } const verifiedAddress = ethers.utils.verifyMessage( expectedChallenge, signedChallenge ); if (verifiedAddress.toLowerCase() !== address.toLowerCase()) { return res.status(401).json({ message: "Challenge verification failed. This request has been denied", }); } const token = sign({ address }, "PRATHAM"); return res.status(200).json({ token }); }
Let's create a file called user.ts inside the api folder, where we will fetch the username from our database if the jwt is validated.
import { NextApiRequest, NextApiResponse } from "next"; import { verify } from "jsonwebtoken"; import database from "../../db/instance"; /** * A simulated "backend" that we're using as an example * of a centralized application, like Rarible. */ export default async function user( req: NextApiRequest, response: NextApiResponse ) { const jwt = (req["headers"] as any)["authorization"].split(" ")[1]; const decoded = verify(jwt, "PRATHAM") as any; const address = decoded.address; const username = await database.getUser(address); return response.status(200).json({ username }); }
Next up we will create a function to verify the jwt and if it's valid, update the database with the new username inside a new file called updateProfile.ts also in the api folder.
import { NextApiRequest, NextApiResponse } from "next"; import { verify } from "jsonwebtoken"; import database from "../../db/instance"; export default async function updateProfile( req: NextApiRequest, res: NextApiResponse ) { // Token is formatted as `Bearer <token>` const jwt = (req["headers"] as any)["authorization"].split(" ")[1]; const decoded = verify(jwt, "PRATHAM") as any; const address = decoded.address; const body = JSON.parse(req.body); const username = body.username; console.log(`Updating username for address ${address} to ${username}`); await database.setUser(address, username); return res.status(200).send(""); }
Finally it's time to build our component Profile.jsx. Create the Profile.jsx inside a new folder called components.
Let's take it step by step. First we create a function to get the message:
import { useWeb3 } from "@3rdweb/hooks"; import { Profiler, useCallback, useEffect, useState } from "react"; import { Button, useToast, Spinner, Input } from "@chakra-ui/react"; export default function Profile() { const { address, provider } = useWeb3(); const [jwt, setJwt] = useState(null); const [username, setUsername] = useState(null); const toast = useToast(); const getChallenge = useCallback(async () => { try { const request = await fetch("/api/challenge", { method: "POST", body: JSON.stringify({ address, }), }); if (request.status !== 200) { throw new Error( `Failed to fetch challenge, status code = ${request.status}` ); } const { challenge } = await request.json(); toast({ status: "success", title: "Got challenge = " + challenge, }); return challenge; } catch (err) { toast({ status: "error", title: "Failed to fetch the challenge", description: err.message, }); } }, [address]);
Once the challenge is received, we will get the JWT.
const getJwt = useCallback(async () => { const challenge = await getChallenge(); const signer = provider.getSigner(); console.log("Signer = ", signer); const signedChallenge = await signer.signMessage(challenge); try { const request = await fetch("/api/jwt", { method: "POST", body: JSON.stringify({ address, signedChallenge: signedChallenge, }), }); if (request.status !== 200) { throw new Error(`Failed to fetch jwt, status code = ${request.status}`); } const { token } = await request.json(); console.log("Got token = ", token); setJwt(token); } catch (err) { toast({ status: "error", title: "Failed to fetch the JWT", }); } }, [getChallenge, provider, address]);
Here is the function, if the JWT is valid and the user wants to update the username.
const updateUsername = useCallback(async () => { try { const request = await fetch("/api/updateProfile", { method: "POST", body: JSON.stringify({ username, }), headers: { Authorization: `Bearer ${jwt}`, }, }); if (request.status !== 200) { throw new Error( `Failed to update profile, status code = ${request.status}` ); } toast({ status: 'success', title: 'Updated profile' }) } catch (err) { toast({ status: "error", title: "Failed to update profile", description: err.message, }); } }, [username, jwt]);
useEffect(() => { if (jwt !== null) { return; } (async () => { await getJwt(); })(); }, [jwt]); useEffect(() => { if (username !== null || jwt === null) { return; } (async () => { const request = await fetch("/api/user", { headers: { Authorization: `Bearer ${jwt}`, }, }); if (request.status === 200) { const { username: newUsername } = await request.json(); setUsername(newUsername ? newUsername : ""); } })(); }, [username, jwt]); if (!jwt) { return <Spinner size="lg" color="black"></Spinner>; }
Finally lets add the html tags and include the calls to the functions to get and update the username.
return ( <div style={{ padding: "20px", backgroundColor: "#f5f5f5", }} > <h1>Your address = {address}</h1> <div style={{ marginTop: "20px", }} > <span>Username = </span> <Input value={username} onChange={(ev) => setUsername(ev.target.value)} ></Input> </div> <Button onClick={async () => { await updateUsername(); }} > Click ME! </Button> </div> );
And for the full code of the Profile.jsx component 👇
import { useWeb3 } from "@3rdweb/hooks"; import { Profiler, useCallback, useEffect, useState } from "react"; import { Button, useToast, Spinner, Input } from "@chakra-ui/react"; export default function Profile() { const { address, provider } = useWeb3(); const [jwt, setJwt] = useState(null); const [username, setUsername] = useState(null); const toast = useToast(); const getChallenge = useCallback(async () => { try { const request = await fetch("/api/challenge", { method: "POST", body: JSON.stringify({ address, }), }); if (request.status !== 200) { throw new Error( `Failed to fetch challenge, status code = ${request.status}` ); } const { challenge } = await request.json(); toast({ status: "success", title: "Got challenge = " + challenge, }); return challenge; } catch (err) { toast({ status: "error", title: "Failed to fetch the challenge", description: err.message, }); } }, [address]); const getJwt = useCallback(async () => { const challenge = await getChallenge(); const signer = provider.getSigner(); console.log("Signer = ", signer); const signedChallenge = await signer.signMessage(challenge); try { const request = await fetch("/api/jwt", { method: "POST", body: JSON.stringify({ address, signedChallenge: signedChallenge, }), }); if (request.status !== 200) { throw new Error(`Failed to fetch jwt, status code = ${request.status}`); } const { token } = await request.json(); console.log("Got token = ", token); setJwt(token); } catch (err) { toast({ status: "error", title: "Failed to fetch the JWT", }); } }, [getChallenge, provider, address]); const updateUsername = useCallback(async () => { try { const request = await fetch("/api/updateProfile", { method: "POST", body: JSON.stringify({ username, }), headers: { Authorization: `Bearer ${jwt}`, }, }); if (request.status !== 200) { throw new Error( `Failed to update profile, status code = ${request.status}` ); } toast({ status: 'success', title: 'Updated profile' }) } catch (err) { toast({ status: "error", title: "Failed to update profile", description: err.message, }); } }, [username, jwt]); useEffect(() => { if (jwt !== null) { return; } (async () => { await getJwt(); })(); }, [jwt]); useEffect(() => { if (username !== null || jwt === null) { return; } (async () => { const request = await fetch("/api/user", { headers: { Authorization: `Bearer ${jwt}`, }, }); if (request.status === 200) { const { username: newUsername } = await request.json(); setUsername(newUsername ? newUsername : ""); } })(); }, [username, jwt]); if (!jwt) { return <Spinner size="lg" color="black"></Spinner>; } return ( <div style={{ padding: "20px", backgroundColor: "#f5f5f5", }} > <h1>Your address = {address}</h1> <div style={{ marginTop: "20px", }} > <span>Username = </span> <Input value={username} onChange={(ev) => setUsername(ev.target.value)} ></Input> </div> <Button onClick={async () => { await updateUsername(); }} > Click ME! </Button> </div> ); }
That's it! Now your app can authorise a change to your backend by signing with your wallet.